More Burrowing Owl Artificial Nest Box Construction
And Burrow Entry Protection Against Domestic Dogs
The basic construction technique using a 5 gallon Home Depot bucket and 12 feet of plastic, corrugated, perforated drain hose, works well in wilderness or extreme rural areas where there are no domestic dogs running around loose. In urban, suburban, and well-populated rural areas there are likely to be dogs allowed to run loose, or wild dogs with no owner or permanent home. Some of these dogs love to chase animals down the holes (such as rabbits) and then try to get at their quarry by digging up the burrow. Even though this is a futile exercise, it ruins the burrow entry and possibly traps an animal inside. To prevent this we recommend that all burrows that use the plastic corrugated drain pipe material be fitted with "hardened" entrances, unless you are ABSOLUTELY sure that dogs cannot get at the burrow (like it's behind a fence) or there is no possibility that dogs could get to the wilderness area. The following images show how a burrow entrance can be hardened at low cost.
 |
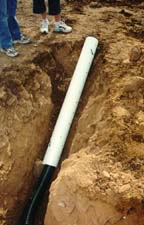
This photo shows how the last 5 feet of the burrow tubing has been covered by a piece of 6-inch, perforated, PVC sewer pipe. It is sold in 10-foot lengths with two rows of 1/2 inch holes already drilled in the pipe. The 10-foot length is cut into two pieces, only 5 feet is needed. Although hard to see, the photo also shows the 3/8" rebar stakes used to secure the pipe to the dirt. At this stage the pipe is ready for "foaming" (described later) before the dirt can be filled in. The 6-inch pipe can usually be purchased at the same locations where the 4" corrugated pipe is purchased. It costs about $17 for 10 feet. |
 |
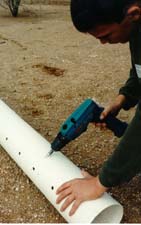
The 6-inch PVC sewer pipe already has 1/2" holes drilled in it, but it is necessary to drill an extra hole at each end of the pipe so that 3/8" rebar can be inserted through the side of the pipe (to hold it in place) without interfering with the 4" corrugated plastic pipe that is inside. Here a volunteer is shown drilling an extra hole so that rebar can be inserted through the side of the pipe. |
 |
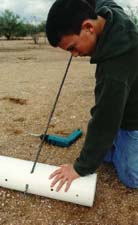
This shows how the rebar can be inserted so that it won't interfere with the 4" pipe inside the 6" pipe. The 3/8" rebar can be purchased in various lengths from Home Depot. Sometimes the ground is so hard in Arizona that the tip must be pointed for the rebar to penetrate the dirt. In these cases 18 inches of rebar is plenty. Where the ground is softer, use a piece 3 feet long. We also use an acetylene torch to make a bend on one end of the rebar so the pipe can't slip off. However, it is not necessary to do that. If the rebar is not driven in too far then the PVC cannot slip off and a dog typically cannot lift the weight of the dirt to move the PVC far enough. The rebar prevents a dog from being able to jerk the pipe from side to side as well as up and down, in case the weight of the dirt is not enough. |
 |
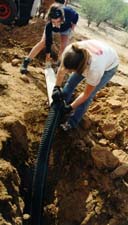
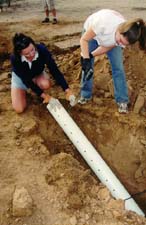
Here the volunteers are slipping the 6" PVC over the 4" corrugated plastic tube, and down into the inclined part of the hole. It is important to have the 4" pipe recessed back about 3 inches into the 6" pipe so that a dog cannot stick his nose in and get a grip on the tube. |
 |
Here the volunteers are driving in the 3/8" rebar stakes. Make sure the top stake (nearest the entrance) is not too close to the entrance. You will want the stake far enough down the pipe so that the rebar can stick up a few inches without reaching the surface. |
 |
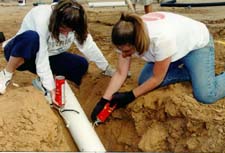
Foaming the gap between the 4" tube and the 6" tube to glue the 4" pipe to the 6A" pipe, is probably the trickiest operation. Be sure to buy STRUCTURAL or CRACK or GAP or MINIMALLY expanding foam. If you get the kind of foam that expands to 10 times the initial volume you will not be able to control it. It will penetrate all the gaps in the 4" tube and completely seal it off. Even so, you must be careful not to use too much foam in one hole. Here the volunteers put the foam tubes in the 1/2" holes in the 6" PVC to apply the foam. One typical can is enough to do two burrows. |
 |
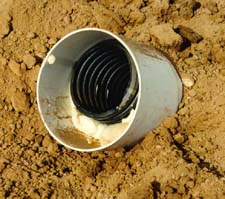
This is what the entrance looks like after foaming is completed and the dirt has covered the 6" tube. Correctly applied, the foam will not extend out to the end of the black 4" tubing. Later, after the foam expands and sets up, the foam will expand to the edge of the black tube but not much past it. Excess cured foam can easily be trimmed with a hack saw blade or serrated knife or key hole saw. After the foam is cured (like a few days) it should be painted. Unpainted foam deterioates in sunlight. We usually paint the white PVC and the foam a flat black. We know this color works. Note in the photo that the 4" pipe is set back in a few inches so that a dog cannot get a hold of it. |
Burrow Construction Questions?, type in b i r d i n f o @ m i r r o r - p o l e . com into your email program to contact us, or if you are really in a hurry, we can be reached at 480-961-4046 during work hours MST.
Copyright Greg Clark, 2002